Worksheet is a Client-Desktop app provided by the GPRO suite to manage the downstream steps for data integration, prioritisation and knowledge discovery of results from omic annotations. Worksheet is a dynamic grid of columns and rows managed by menu allowing the user to easily manage one or more annotation sets. The software is coupled with the GPRO server infrastructure to call several knowledge databases from where Worksheet extracts the annotations. Worksheet is also able to link fasta files to the annotation file opened by worksheet to mine, filter or prioritise sequences according to the information provided by the annotations.
1.2 - VERSION
The current version of Worksheet is 2.0, which is distributed within the GPRO suite as an installer for Windows 7 (64 bit), a self-extracting disk image for Mac OS X 10.6 or later (64 bit), and a compressed tar file for Linux 2.6 kernel series or later (64 bit).
1.3 - INSTALLING WORKSHEET IN YOUR PC
Worksheet is a Java application that can be easily installed on PCs with at least 2GB of RAM and that have installed the Java Runtime Environment (Java JDK) version 17 or above.
To check if you already have a JDK installed, open a command line interface and type:
java -version
If you have the java version 17.0_xx, you should see the following message:
        $ java -version

        jopenjdk 17.0.14.1 2022-02-08

        OpenJDK Runtime Environment (build 17.0.14.1+1-Ubuntu-0ubuntu1.20.04)

        OpenJDK 64-Bit Server VM (build 17.0.14.1+1-Ubuntu-0ubuntu1.20.04, mixed mode, sharing)
If you get a “Command not found” error message, it means that JRE is not installed.
For installing JRE, go to the official JRE repository here and download the version matching your operating system. Once installed, check again the output of java -version command on a command line interface. Sometimes, although the JRE is installed,
it is not set at the path.
To install the Windows version:
Extract the archive using archiver utility program e.g WinRAR. Then browse to the executable file “worksheet.exe” and execute/run it.
To install the Mac version:
Extract the archive to the desired destination using:
$ unzip worksheet.x.y.os.zip
Then browse to the executable binary file “worksheet.app” and execute/run it.
To install the Linux version:
Extract the archive to the desired destination using:
$ unzip worksheet.x.y.os.zip
Then browse to the executable binary file “worksheet” and execute/run it.
NOTE: Take into account that the view of the following manual can change depending on the Operative System used.
1.4 - GETTING FAMILIAR
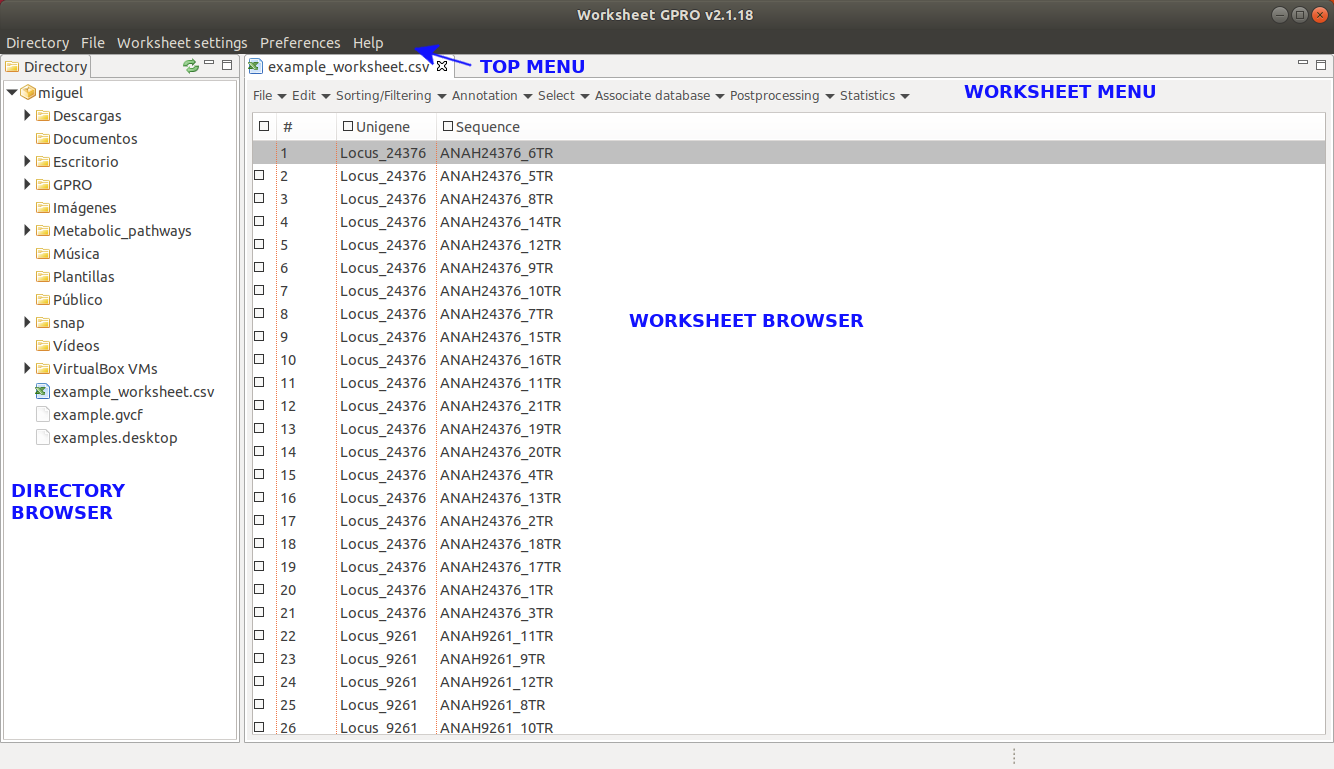
The layout of Worksheet is based on the following features; “Directory Browser” “Worksheet Space”, “Top Menu” and “Worksheet menus”.
Figure 1: Basic layout of Worksheet. The directory Browser and Worksheet space can be resized as convenience or masked clicking on the icons at the right top corner.
DIRECTORY BROWSER: to set any folder of your PC as directory for storing the files managed by Worksheet.
WORKSHEET SPACE: Central worksheet space to manage annotation files.
MENUS: Worksheet provides two menus, the top menu and the worksheet menu with distinct functions to manage the data. The TOP MENU manages general aspects of Worksheet, which are organized as follows. The TOP MENU manages general aspects as it is organized as follows.
[ Directory → Show ] : view the Directory Browser.
[ Directory → Hide ] : hide the Directory Browser.
FILE:
[ File → New Worksheet ] : to create a new worksheet project.
[ File → Open Worksheet ] : to open an already existent CSV file as a worksheet.
WORKSHEET SETTINGS:
[ Worksheet Settings → Worksheet preferences ] : to select fonts and other parameters.
PREFERENCES:
[ Preferences → Proxy Connection Settings ] : setup proxy configuration for server connection.
[ Preferences → Pipeline Connections Settings ] : setup your user credentials to access the server.
HELP:
[ Help → Manual ] : A link to this manual.
[ Help → About Worksheet ] : Other technical details and copyrigth of Worksheet.
The WORKSHEET MENU is available at the top of the worksheet space and presents the following utilities.
Figure 3: Worksheet menu.
FILE:
[ File → Open Worksheet ] : to open an already existent CSV file as worksheet.
[ File → Save ] : to save changes into an already existent CSV file.
[ File → Save as ] : to save the worksheet information into a new CSV file.
[ File → Import ]
[ Import → Append Worksheet ] : to merge two or more CSVs.
[ File → Import → Combine Worksheet ] : to integrate data from one or more csv files into a single csv file using a common column as a link between both files.
[ File → Export ]
[ Export → Worksheet and Fasta ] : to export a set of annotations and fasta sequences selected in the worksheet into a new csv and/or fasta files.
[ Export → Categories and Clusters ] : to export a set of annotations selected in the worksheet into a single or more files organizing the annotations using the non-redundant terms of a given column a clustering criterion.
EDIT:
[ Edit → Undo ] : to undo the latest actions performed within the worksheet.
[ Edit → Search and Replace ] to search and replace terms within the worksheet.
SORTING/FILTERING:
[ Sorting/Filtering → Sort ] : to organize worksheet contents according to the ascending or descending order established in a column.
[ Sorting/Filtering → Filter best isoform or hit ] : to select the most representative isoforms or sequence belonging to the same unigene, or presenting the same accession or identifier.
ANNOTATION:
[ Annotation → Download Gene Bank accessions ]: to obtain GenBank accession files or fasta sequences from GenBank using a column of the Worksheek with GenBank accessions.
[ Annotation → GO analyses ] : to append GO terms to the Worksheet using a column with the GenkBank accession as linking reference for the annotation.
[ Annotation → Add Enzyme Commision numbers ]: to append Enzyme Commission (EC) terms to the Worksheet using a column with the GO terms as linking reference for the annotation.
[ Annotation → Add annotations from knowledge databases ]: to add annotations from different databases and vocabularies using a column as linking reference.
[ Annotations → Add Metabolic Pathways ]: to mine information of metabolic pathways related to annotated ECs from distinct online knowledge databases.
[ Annotations → Coloring annotations ]: to highlight annotations with different colours.
[ Annotations → Remove row colors ]: to cancel the color selections.
SELECT:
[ Select → by key terms ]: to select sequences (i.e. rows) using specific terms matching to the contents of a particular column.
[ Select → Select by expected or statistic ]: to select sequences (i.e. rows) using specific numerical criteria matching to contents of a particular column.
[ Select → By colors ]: to select some rows from the set of previously coloured rows.
[ Select → By multiple criteria ]: to select sequences combining terms that can either be qualitative or quantitative and used as criteria of selection several columns.
[ Select → Delete checked rows ]: to cancel the selection.
ASSOCIATE DATABASE:
[ Associate database → Link sequence database ]: to associate a sequence fasta file with the annotations for these sequences in the Worksheet.
[ Associate database → Unlink database ]: to unlink the fasta file from the Worksheet.
POSTPROCESSING:
[ Postprocessing → Editing sequences ]: to trim upstream and downstream regions in fasta sequences using the annotations of coordinates provided by the CSV file.
[ Postprocessing → merging sequences by common subject ]: to merge fasta with overlapping or non-overlapping coordinates respect to a common mapped subject.
[ Postprocessing → curate annotations ]: to merge and curate two or more annotation lines in the worksheet based on several criteria and filters provided by the user.
STATISTICS:
[ Statistics → Plots ]
[ Plots → Numerical data plots ]: to represent frequencies and distribution plots based on quantitative data.
[ Plots → Categorical data plots ]: to represent frequencies and distribution plots based on qualitative data.
[ Statistics → GO analyses ]
[ GO analyses → Evidence Weights ] : to set weights to the evidence code.
[ GO analyses → Display Graph ] : to display the GO DAG.
[ GO analyses → GO distributions ] : to analyse the distribution of GOs in the annotations.
1.5 - SERVER DEPENDENCIES
Worksheet implements some utilities that call the GPRO server infrastructure. To allow Worksheet to work appropriately you must to install the following requirements
Server requirements:
Linux Operating System with minimum Bash version 4. Mysql DBMS Server.
Recommended version 3.3.
Bioconductor.
Apache HTTP server 2.2 or later.
PHP 5.
Perl 5.
Python 2.7
Other scripts created by Biotechvana to handle clients connections and run jobs/pipelines.
A tutorial for installation of all server dependencies of Worksheet is available here.
1.6 - TESTING THE SERVER CONNECTION
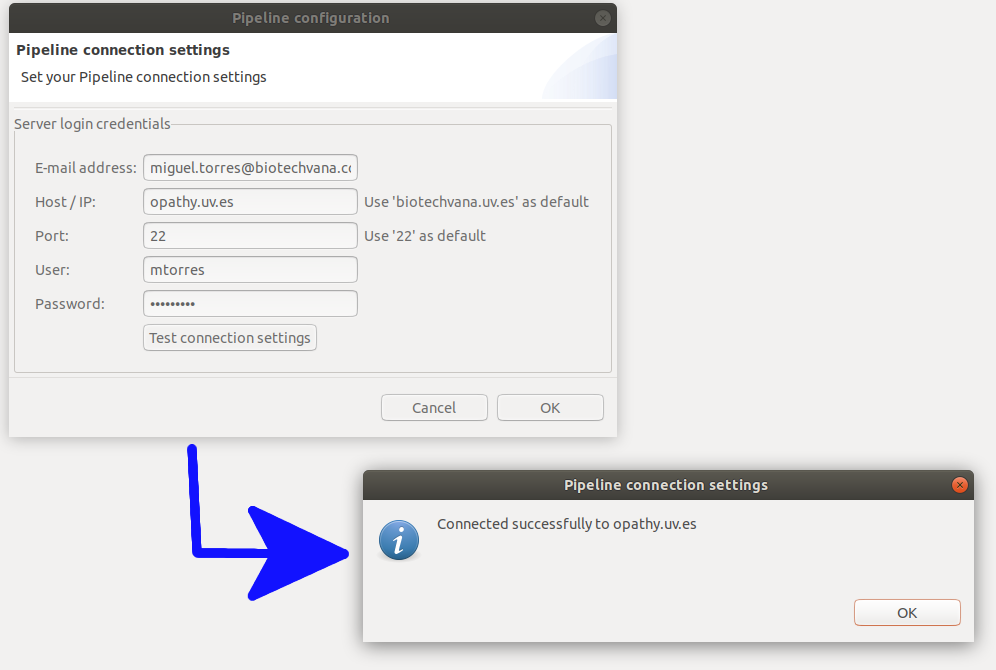
Once the server infrastructure has been installed and configured you must link Worksheet with it. To do this select “Preferences → Pipeline connection settings” of the top menu and type the following in the configuration Dialog:
Your email address: to receive notifications from the server.
Host address: of the server you want to connect to.
Port number: for using ssh. Default is 22.
Username and password for you in the host server.
To test if you are connected with the server click on the button “Test connection settings”. If you are connected you will be noticed as indicated in the figure below.
Figure 4: Pipeline connection settings.
If you otherwise need to connect the server infrastructure via Proxy, Worksheet will require to be configured. You can choose one of the three following methods:
If you do not know the proxy settings, choose the "Use system proxy settings" option to let Worksheet to guess the default proxy settings already configured in your computer.
If you know your proxy settings, you can specify the proxy configuration. This is the preferred option when using a network proxy. User, password and FTP settings are optional. The port for HTTP proxy is usually 8080 by default.
If you have a Proxy Automatic Configuration file (.pac) URL, use it for loading settings automatically from a remote file.
Figure 5: Proxy configuration (only if your server uses proxy).
1.7 - RAM ASSIGNATION TO YOUR PC
The RAM assigned to Worksheet can be modified editing two parameters (Xms and Xmx) in the configuration file named “Worksheet.ini”. In Linux and Windows computers, the “Worksheet.ini” configuration file is located inside Worksheet app folder. On macOS computers, this configuration file can be found by right-clicking on Worksheet.app → Show package contents → Contents → MacOS → Worksheet.ini.
Within the “Worksheet.ini” file, Xms and Xmx parameters look like this:
The values correspond to the assigned RAM in Megabytes. To modify the RAM assigned to Worksheet, just change these values. Please keep in mind that the limitation depends on the amount of RAM of your computer. E.g. if your computer has 8GB of RAM, it is recommended to assign Xms2048m and Xmx4096m for a better performance. Xmx can be even increased up to Xmx6144m.but please avoid to use RAM values near to the maximum available memory of your PC as this election might provoke unstability in computer’s operating system.
1.7 - INPUT FILES: SINGLEHIT/MULTIHIT
The input file managed by Worksheet is a plain file with sequences and their annotations, normally a CSV file although Worksheet is also able to read plain files in any format (txt, gff, gtf etc). Rows refer to the query sequences while columns refer annotation sources/items. An example of CSV file typically accepted by Worksheet can be downloaded here.
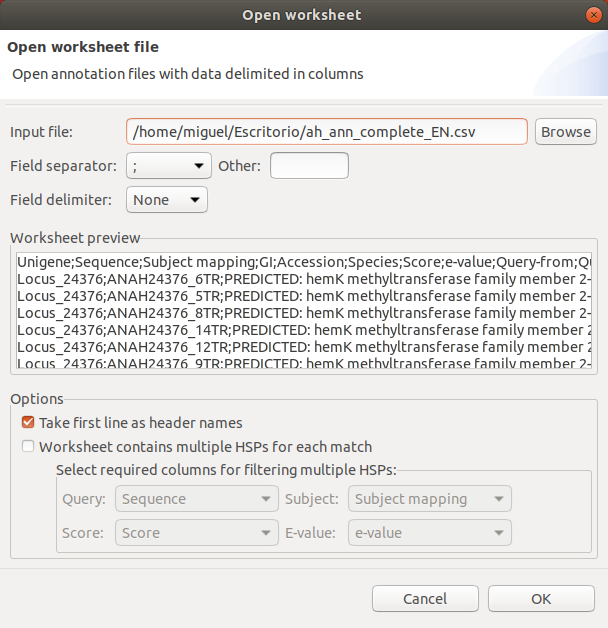
When you try to open a csv file with Worksheet a dialog appears (Figure 6) allowing you to tell the worksheet interpreted which format of column separator (spaces, commas, semicolons) is your file. You can also tell the interpreter to manage decimal separators as commas or as dots as well as to open the csv as a multihit or as a single hit file (option “Worksheet contains multiple high scoring pairs (HSP) for each match”).
Figure 6: Opening a csv file with Worksheet.
The multihit/singlehit option useful if you have multiple annotations per query (from a BLAST search for instance). The difference between the multihit and singlehit modes is that if you choose the later Worksheet will show only the best hit per query. If you select the multihit option Worksheet will split the CSV in two files: one of these being a singlehit file that will keep the original name while the other file will be the multihit file that will be entitled as _multihit.csv. Then, Worksheet will open the singlehit file but coupled with the multihit file, permitting you to visualize in a separate dialog all detected hits per sequence and change the current annotation of that sequence by another (if appropriate) using the mouse as indicated in the next section below “Mouse Dialogs”. By default, the aforesaid option remains unselected thus meaning that Worksheet will open by default the CSV as a singlehit file.
1.9 - MOUSE ACTIONS
Worksheet includes some mouse-dependent utilities that can be used just positioning and clicking the mouse in the corresponding place. By right clicking on the directory space a dialog will appear providing the typical actions to create and manage files/folders/worksheets. You can also cut, copy, paste, delete and rename files.
Figure 7: Mouse-dependent options and tricks.
As shown in Figure 7, by selecting and left clicking on any row cell (corresponding to a sequence), it will appear a note field editable section for you to add information regarding the selected sequence. All Worksheet cells (including column names) can be edited with the mouse. By right clicking on the Worksheet space, a dialog will appear providing two options: Columns and Rows. The first one offers a sub-dialog with additional actions for adding, selecting, removing, renaming or joining and splitting columns. The second permits to do the same and other actions concerning rows. For instance, if you are dealing with a multihit CSV file you can place the mouse in one row, make right click > Rows > Show BLAST multihit and visualize the set of alternative best hits for your sequence annotation and switch it (if appropriate) by another selected from this summary. You can also view the sequence details by accessing the note field of any particular sequence (right clicking directly on the Worksheet grid).priate) by another selected from this summary; b) View sequence details: this is another way to access the note field of any particular sequence (also accessible right clicking directly on the Worksheet grid).
Hipra Scientific S.L.U, Polypeptide Therapeutic Solutions S.L., Biotechvana S.L. and Nostrum Biodiscovery constitute the consortium of enterprises participating in the project "Research of a new vaccine for a human respiratory disease", granted by the CDTI (Center for Industrial Technological Development), and supported by the Ministry of Science and Innovation and financed by the European Union – NextGenerationEU. The main objective of this project is to design a safe immunogenic and effective vaccine against the respiratory syncytial virus.